Showing posts with label herb spiral. Show all posts

Tuesday, 15 April 2014

Frugaldom - Creating a self-sustainable microholding

140414 (14)

Creating a self-sustainable microholding

A photo blog of the day's progress. Unpredictable weather should no longer be a problem now that the poly tunnel is reinstated but the sun shone this afternoon, so we were able to get outdoor jobs done. For me, that included sowing the new beds, transplanting the lavender cuttings and digging up more rooted strawberry runners from around the herb spirals to transplant into their recycled milk carton 'pods'.

See photos here

Tomorrow will be about the pets and livestock of our ever evolving, frugal microholding project.

Saturday, 6 July 2013

Back on the Trail of the Frugal Microholding (Part 2)

Getting to Grips with Permaculture

Part 2 of 3
 
Part one dealt with the bottom half of the Frugaldom garden, where there may one day be a productive little orchard and from where we are provided with our eggs from the hens and ducks. Part two is about how things are progressing and how well we can utilise the space we have that is both productive and in keeping with the principles of permaculture. This is my blackcurrant patch and the rhubarb is along the wall behind this.
 
For some reason, blackcurrants absolutely LOVE this garden and
are producing so much fruit that I may need to develop this into something a little more lucrative and self-sustaining than jam making. These bushes just haven't stopped growing, so I took hardwood cuttings (seen right of photo)and now these, too, are laden with ripening fruit. By the looks of things, there should be both blackcurrants and blackcurrant bushes available for sale later this year. To give you an idea of how productive these bushes are, I have sufficient jam to last me the next two years plus several kilos still in the freezer from last autumn's crop. Orders can be taken now if anyone would like any. With luck, I may even still have a record of what types they are - I know these earlier cropping ones all originate from my Ben Connans.

I have a shed where I house a few quail for eggs - a delicacy that we afford ourselves owing to the fact that the birds are relatively inexpensive to keep and that I, one day, would really like to develop that aspect of the microholding further, but other things have taken priority. Alongside the shed I have this 'spare' patch of ground, bordered by more raspberries and gooseberries. This is the patch that will feature in my next blog post, as a final decision has been made about what to do here to make it as productive as possible. There's no soil, as such, and last year's attempts to grow anything in it failed miserably. All we succeeded in doing was feeding the slugs, snails and sawflies, which have completely stripped my gooseberry bushes this year, again!

You all know how much I love my herb spirals and my circular gardens - they are all just so productive, easy to build and easy to maintain, so I now have four of them! I have two spirals and two circular beds of varying sizes and each is as productive as the next. Obviously, the first one built a year ago is ahead of the others, but they will soon catch up and become self-sustaining.

On the right, you can see the first one we built last May/June. The sage has been left to flower and last year's strawberry runners are filling up the gaps nicely!

Next I have the circular beds - one large one next to the first spiral and one smaller one linked to the patio area. Both are thriving in very different ways and both have been integrated with bird feeding stations.

This is the larger of the two, planted with assorted herbs, including one of my personal favourites, lemon balm - a type of mint. I also planted a cutting of lemon thyme in this bed, a gift from a fellow frugaler, so it's a place that the midges don't tend to frequent.

The lemon balm is great for its citrus scent and as the basis for a cup of lemon tea. Even daughter appreciates fresh lemon balm mint tea. Many cuttings will be propagated from this spiral bed so I have them available for trading at a later date. Indeed, all of the herbs growing in it at present have come from cuttings elsewhere. In the background, you can see my 'bug hotel' alongside two small square raised beds. The above photo shows the newest addition - the second spiral bed is now showing signs of coming to life with mint, basil and rosemary.

This is the bug hotel as it looks now. The main frame of the structure is built from an old wrought iron clothes rail, which has been built up with bits of concrete blocks, bricks, logs, pieces of pipe, plastic drinking straws, mesh and all manner of things found lying about the garden. An old piece of felt was used to cover a bit of board as a roof for it all and this now doubles as a shelf, where I can sit the pots of cuttings.

The honeysuckle has now wound its way around the top of the frame and is beginning to bloom. The little wooden box at top left is a butterfly box, a cheap bargain discounted item bought from an Aldi store. I don't think we have managed to attract any butterflies in there yet, though.

The two raised beds were purchased new while reduced in an online sale - bought via Topcashback to give me just that - cash back that converted into Amazon vouchers to give me a further 5% value. These were used in last year's Biochar experiment but I failed to see any difference between using the biochar and not. It's still in the box at the left, where you can see that my cabbages and sprouts are needing moved. The largest patch of greenery is a rogue Nasturtium and a sunflower that must have been dropped by a passing bird. The bracken fern behind it should really get pulled out but it seems to keep the slugs off the seedlings. I really need to get these seedlings thinned out as there are carrots in there, too. On the right, are my spring onions and a row of all year round cauliflowers that will also need transplanting very soon!

Despite me saying these were only going to be temporary, my plan being to improve the beds and get back to square foot gardening this year! Now look at it - two full beds of spuds that now need banking up with even more soil and compost, mixed with whatever else I can get my hands on, as soil isn't something we have much of about here. I am already regretting having potatoes in here taking up all this space. There are more potatoes sprouting in the micro-orchard among the edible hedging after we must have missed some of the potatoes there last year!

This is the polythene greenhouse that I was built last year. It's made from 2" x 2" and whatever bits and pieces of wood and board were left over from having the out-building renovated. I can easily walk in and out of it but anyone taller than me (most are) needs to duck down to get inside. Suits me just fine for pottering about, although it doesn't allow much growing space by the time the potting table is in it. The tomato seeds went straight into the ground but I don't know if they will grow quickly enough to produce fruit.

The green box alongside is my posh wormer, bought with my £2

 
coin savings pot last year. The worms have multiplied and I have hundreds of babies in there now, plus it is producing plenty of that wonderful worm juice fertiliser. My grand children think their granny is crazy for keeping pet worms, but that doesn't stop them from feeding said worms while here visiting!

Finally, to round off part 2 of this three-part post, this is the old aviary cage we got around 10 years ago. We no longer use it for finches, so it has been lying in pieces out in the shed at the bottom of the garden. Looking at it, I thought to myself, what better way to support the beans and peas than to get them to grow up the cage while waiting for it to become an integral part of the permaculture garden? I have several plants to train up and over this, which will also house bird nest boxes inside it to protect any little visitors from the cat! At the moment, I have beans in troughs on two sides and will have peas on the other two sides, but I am sure the Russian Vine, ivy and honeysuckle cuttings will be well established by next year, turning this into a piece of environmental art as part of our eco-arts project!

Now that we have reached the end of part 2 of these 3 significant posts, I hope you wont mind my ploughing on with the third. I think it's the most exciting part!

Frugaldom.

Thursday, 25 October 2012

Autumnal Updates

Autumn Update from Frugaldom


It may be late October but the garden isn't 'done' for the year, not yet. IN fact, it's far from it - I still have a profusion of flowers - nasturtiums, begonias, heather and alliums, to name but a few. The days are shortening, night's are lengthening, temperature's dropping and leaves are falling, but there's still some sunshine about the place. I've been amazed at how warm it still gets in the little plastic greenhouse, so rather enjoyed doing the bit of tidying and weeding when I went to clear out all the tomatoes last weekend. But then I changed my mind! They simply weren't ready for clearing.

We all know what we're meant to do with tomato plants - keep the side and top shoots nipped out to promote growth into the half dozen (maximum) vines of flowers/fruits while keeping them fed and watered. I set out to nip buds faithfully as soon as I spotted them on my plants, but then things went awry again, with family crises that took me away from home. The plants went a bit wild and have received no extra feeding at all. But guess what? This year has produced the best crop of tomatoes I have ever grown!

Kilos and kilos of the things have been picked over the past couple of months and I am still picking them. There are side shoots and new vines replacing the old ones as I strip them of tomatoes. Even my fancy 'black' tomatoes are doing exceptionally well.

tomato plantsAll of these photographs were taken today, 25th October 2012, and show the condition my tomato vines are in after stripping them of all their dead or dying leaves at the weekend. Each time I pick the tomatoes, another shoot appears, more flowers grow and that, of course, is followed by more tomatoes! It's amazing. One plant in particular - a cherry tomato - ended up looking like a weeping willow decorated in little red baubles. I have picked dozens and dozens of small tomatoes from this 'tree' and still it continues to grow and produce.
 
The 'black' tomatoes are also still doing well, although the revived grape vine managed to climb up through and it is now needing some attention. These dark , cherry tomatoes are a sweet variety, so very nice, although a little strange looking, with salad. Regardless of how late it is in the year, the vines are still producing more flowers and we still have some bees buzzing about the place. It's all very unusual, but not as unusual as the tadpoles that were spotted recently, swimming about in the pond at the nearby Logan Botanic Gardens!
 
Elsewhere in the Frugaldom garden, the herbs are still doing amazingly well, with bundles of mint being picked for pots indoors and all the begonias adding an extra splash of colour outdoors. In the ericaceous bed, where I planted the new blueberry bushes, heather is still in full bloom, adding a good dash of purple to the reds and oranges of autumn. I also have lavender still flowering in pots along the top of the 'bug hotel'.
 
It's been a strange year for gardening, what with the early months of hot sunshine followed by prolonged damp periods, to sudden deluges that have seen our little stream erupt in torrents, rising higher than the foot bridge and completely cutting off the hen run from the main garden. Thankfully, we opted to incorporate drainage from the duck pond, so there have been no flood problems there, so far. 
Spots of colour are still visible around the entire garden. The temperature reached an astounding 21C through the week in the direct sunshine, so the hanging baskets are holding out a little longer. I'm not giving up hope of growing something through the winter, even if it's just salad leaves. On the subject of growing over winter - has anyone else noticed FLOWERS on their strawberry plants? I have runners sprouting out all ways, waiting to be potted, but I've also spotted flowers on some of the plants. Most peculiar!
 
Indoors is progressing slowly but surely and I'm hopeful of having a frugal kitchen (of sorts) within the next week or two. No preserves got made this year at all, but I do have a lovely stock of raspberries, blackcurrants, rhubarb and gooseberries in the freezer and should be OK for lemon curd making, if I continue freezing any surplus eggs. (Egg-laying has diminished to no more than a couple of eggs every other day.) Sadly, there has been no fruit from the mini orchard, but we weren't expecting much after transplanting all the young trees during the move here last year. I may take a trip to a friend's orchard this weekend and see if they have any to spare.

I hope you are all doing well with whatever frugal challenges you opted for this year and I sincerely hope that some of you will continue by joining for 2013. Otherwise, thank you for reading the sporadic witterings that I manage to type from this almost forgotten corner of Scotland. If you have access to Facebook, I have loaded photo albums of the area, all of which can be accessed from www.elrig.info
 
As always, you are welcome to join us in the frugaldom forum at http://frugaldom.myfreeforum.org or else follow @frugaldom on Twitter www.twitter.com/frugaldom
 
If you are self-employed, living and working in Scotland, or simply interested in what else is going on here, you can also join us at www.facebook.com/NYKMedia and become part of our free Scottish Web Directory. The directory, which is still in early stages, can now be found at www.scottishwebdirectory.com
 
FEEL FREE TO JOIN FRUGALDOM!

Monday, 23 July 2012

Some Summer Updates from Frugaldom

Life in Frugaldom

There has been so much happening in the garden that work indoors has ended up on the backburner again! End result is, we still don't have a kitchen but we have a whole host of critturs, beasties and birds visiting the wildlife garden and, in return, not an awful lot by way of homegrown vegetables.

The strawberries did incredibly well and we're now onto blackcurrants and raspberries. I think I've picked a sufficient quantity of blackcurrants to make enough jam to last us until next year, but have had to freeze the berries pending further work on what will, eventually, be reinstated as my kitchen.

Last week, I picked the first cabbage, but there are few surviving the constant slug attacks. The slugs are out of control at the moment, so I really need better defences and a clear division made between the vegetable plots and the rest of the garden. This permaculture lark is all fine and good, communing with nature and encouraging wildlife, but it's very time consuming and slow to cultivate.

The herb spiral, on the other hand, has come on in leaps and bounds, producing a profusion of herbs, strawberries and water cress in the tiny 'pondlet' at the bottom of it. Since building this one, I have now completed a second, circular bed adjacent to it, which has been planted with more herbs and flowers. The herb spiral is a garden feature that I can highly recommend, I'm really impressed by how well everything grows in it.


My next project was 'the logman'.

Late last year, a neighbour had a conifer felled and gave us all the wood, so it had been stacked at the bottom of the garden for some time. To be honest, it isn't the best type of wood for burning on an open fire, so this led me to thinking up a novel idea of what to do with the logs - I built a raised bed shaped roughly like a boat and have planted blueberry bushes and heather in it. At the 'helm', I used the final log to make a bird table and named him 'the logman'. He's very popular with the birds, I have to admit, and his lantern can be lit on summer nights, so he's become quite a feature in the Frugaldom garden. His face is made from bottle tops and a twig, with some more twigs secured around the edge of the slice of log that serves as the bird table. Again, I am really pleased at how this turned out and even more impressed by the number and variety of birds that frequent 'him' on a daily basis.


The good weather continued here despite tales of flash floods and high tides elsewhere, so it seemed like a good idea to make a start on creating the long awaited 'bug hotel'. Some readers may remember I was able to get a wrought iron hanging rail from someone on Freecycle a few years back and this was originally converted into a vegetable growing rack. This year, however, it became the basis for the new bug hotel. I was inspired to begin this project after reading about 'Bugingham Palace', so set about creating my own, frugal version.
The Frugaldom bug hotel was completed last week and even includes a homemade bee house, which was made using the hollow stems pruned from the Himalayan Honeysuckle at the bottom of the garden. Again, I am quite proud of the end result, finishing it all off with a butterfly house that I found for half price in Aldi. £3.49 seemed like a small price to pay when everything else used was free. I have now made a start on the bottle garden, but it's only in the early stages, so nothing much worth discussing just yet.

 But what about the whole homeworking/microholding/self-sustainability 'thing'?, I hear you ask. Well, while the weather has been good, we have taken the opportunity to invest some of the savings into renovating the old outbuilding, which will then provide us with safe, dry storage space and work-space by way of a garden room, otherwise known as our eco-arts studio.

This is what the building looked like when we first bought the property. It was a derelict disaster zone, to say the least. It took us months to clear away all the rubbish that completely filled it and surrounded it, then there were all those broken windows to sort out before they fell on anyone.

The serious work began on this project about three weeks ago, but it has proven to be a far bigger job than first anticipated. For a start, the roof and two full walls - those not shown in the photos - have had to be removed and replaced to make the building safe. In order to do this, we had to disconnect the electrics, (I could hardly believe there were live wires in there in the first place!)which will need to be fully replaced at some point.

We are now at the stage of needing to find a door and new windows to replace the old ones, so I've been busy scouring the area for anything that might fit. Hopefully, one of the glazing companies from the nearest town may have some old ones available at a cheap enough price to warrant moving them and making them fit the gaps. In the meantime, the old concrete blocks have had a coat of whitewash to brighten them up a bit and there's someone out there right now sorting out the floor and replacing all the wood. Exciting times ahead and everyones' fingers are crossed that the sunshine will return soon so we can complete the renovation. Only then will we tackle the completion of the kitchen.

For anyone interested in life in and around our area, I have set up a Facebook page that is now home to all the photographs of the surrounding area, along with progress photos taken of the wildlife garden, so please feel free to visit and 'like' the page, that way you can be kept bang up to date with garden progress in our tiny corner of southwest Scotland.

The Frugaldom forums are also still fairly busy for anyone who would like to take part in any of the frugal living challenges.

Hoping not to leave if for so long next time and looking forward to making the most of this summer's staycation. There's so much to see and do when you're trying not to spend, so wildlife, nature and the 'make do and mend' activities are all being well served, as are free events being attended.

Thursday, 17 May 2012

How to create a spiral garden, part 2

Frugaldom's Herb Spiral

In part 1, we'd got as far as creating a pretty, spiral looking garden that, other than the general shape, didn't really resemble anything shown in permaculture books or on the websites, so we had to improvise and frugalise our herb spiral, enabling us to complete it on a budget of zero.

The following is the pictorial guide to how we got the project off the ground, so to speak.

STEP 1 - CHEAT!

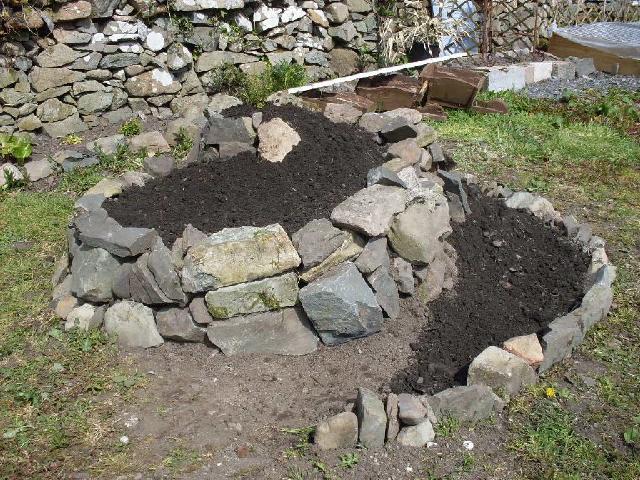
As you can see, our herb garden has suddenly grown upwards in the centre and the spiral now has a fairly steep incline, hopefully making it entirely suitable for the purpose of drainage. This feat was achieved by raking all the soil from the centre back out to the edges and then piling logs and rocks into the middle, to create a platform for the top of the spiral. You could use straw, rubble or anything else, I guess.The rocks are the essential ingredient here, as it is those that will store the heat from the sun and bring added warmth to your soil.

STEP 2
Once again, from the top...

Fill the spiral path with soil and pile up whatever rocks you can find to create that much higher looking wall of heat absorbers. We had to dig a couple of barrows of soil from elsewhere in the garden just to achieve this much but all the extra rocks that came with it helped fill in gaps, which then get packed on both sides with the soil.


STEP 3
This spiral path means you have an 'empty' gap at the bottom of your horticultural helter skelter, which is where we are supposed to focus on collecting the run off water from heavy rain. I have seen some very pretty, artistically designed mini ponds built here, as displayed on many of the permaculture websites.

But this is Frugaldom, we need frugal alternatives that won't cost us our hard-earned cash.

STEP 4 - CHEAT!
I simply rounded off the end of my spiral with more rocks and then dug a hole approximately 30cm in diameter and about 10cm deep. This worked perfectly for the base cut from a 5kg / 5L plastic bucket. Any type bucket will do, as long as it's cleaned properly to free it from any traces of paint, for example. I filled my 'pond liner' with a layer of gravel, soil and then a little compost, then began planting my herbs.


STEP 5
There is a natural way of planting out your herb spiral. As it has planting space facing in all directions and graduating from fairly dry (at the top) to almost a pond at the bottom, you have plenty of choices. Rosemary is my top of the hill plant, then they graduate down the slope with thyme, basil, parsley, chives, coriander/cilantro and then the assorted mints, which like a fair bit of moisture. In between these, I have planted the surplus strawberry plants from last year's runners, along with a few marigolds. In the mini-pond at the bottom of my spiral, I am going to sow water cress seeds, something I have never tried before now.

My herb spiral is far from full, with plenty of space for cuttings and any 'reduced' potted herbs I might find. I would love some lemon thyme, but can't seem to find any at the moment, but I have seeds sown for more coriander, chives, basil and parsley. It's quite exciting waiting for everything to grow and spread, as I think this is a lovely feature in the Frugaldom garden, even if it does look like a cairn when viewed from my kitchen window! :)

Many years ago, these spirals were often refered to as medicine gardens, where healers (some would call them witches) grew all types of herbs and spices for their medicinal lotions and potions. Usually found near the back door for quick access during cooking, to ensure only the freshest of ingredients get used, I am sure there is much still to be learned from what can be grown within a specific space, especially when attention is paid to companion planting and which direction each plant faces. It's amazing how nature will soon dictate how well, or how badly, I have positioned the first of my plants.

Have fun creating your own spiral gardens. They needn't necessarily be used for herbs, they would make beautiful fruit gardens, vegetable gardens or flower gardens. Plenty of scope, too, as the loose formation of the basic building blocks means gaps could be filled with heathers, alpines, mosses or grasses, depending on what you have chosen to grow. For me, it will be herbs galore, as soon as I grow some more.

Frugaldom

How to create a spiral garden, part 1

Frugaldom's Herb Spiral
The idea of having a spiral herb garden was introduced when reading about permaculture and, more recently, discussing the garden with a friend who had done the permaculture course.

Microholding fits nicely with the theories of permaculture, as we want low maintenance and high productivity, but with plenty of nooks and crannies for encouraging wildlife to visit our garden. It also lends itself quite well to frugal living and a level of self-sufficiency.

The following is a step-by-step pictorial guide to how we created our first herb spiral. It isn't quite 2 metres in diameter, as the stick I used to mark it out was only 3' long.

STEP 1
Armed with two sticks, one measuring about 3' (or a metre) in length and then find yourself a fairly level patch of ground. Keep the 3'/1m stick for measuring and push the other one into the ground to mark the centre point of your circle. It is then a simple process to lean the second stick across the ground perpendicular to the upright one and gradually work your way around, marking the outer edge of your circle as you go. I scraped out the outer edge and wedged stones into the groove.


STEP 2
As soon as you have your circle, you can do one of two things, depending on where you have sited your new garden: you can either cover the whole area in thick cardboard and then fill it with soil or you can dig out the weeds, gravel and grass to get at the earth underneath, which is what I chose to do. This choice was mainly on accounts of not having a budget for such things as top soil.


STEP 3
Our ground is very rocky, so digging up the surface of my circle uncovered plenty more stones, all of which were being set aside for later use.

The main reason I was happy to dig to the earth rather than use cardboard was that it would instantly give me a little more depth, rather than the metre height these spirals are supposed to be.


STEP 4
After a couple of hours of scraping, weeding, digging and raking out more stones, I was left with a fairly accurate circle. At this point, I was looking at a template on a permaculture site, one which made it look really simple. Let me tell you, it is not simple trying to create a metre high, geometrically correct, artistic spiral while working with practically no soil and only stones and rocks found lying around the garden. Some slight changes had to be introduced to compensate for not buying nice, uniform blocks or an extra ton of fresh top soil!

STEP 5
Raking what soil I had from the edges into the centre of the circle, it was a case of replacing the smaller stones with larger rocks, gradually creating and following a contour upwards, while raking more and more of the earth up the spiral path until it was heaped in the centre.

As you can plainly see, the centre of this is about one third of the height it is meant to be, according to the recommendations of the 'proper' permaculture gurus.

STEP 6
The whole idea of the spiral is that it starts at its highest point and winds downwards, creating a natural flow for excess surface water and excellent drainage.

No amount of raking this was going to raise it to a metre high, that was for sure! Meanwhile, H was busy digging elsewhere, trying to salvage some extra soil to pile in, but it certainly wasn't looking anything like the one in the diagram. Still, it looked quite pretty.

By this point, it was beginning to get dark and I had forgotten about making any dinner. The chickens and ducks had got fed up waiting and had all put themselves to bed! Moral of this story is that if you want your spiral created quickly, then starting it late afternoon probably isn't the best of ideas. We had to down tools and leave it for another day.

Wednesday, 16 May 2012

Solving the problem of holes in concrete

A FRUGAL PATIO GARDEN

The area we have designated as our patio had one glaring problem - a massive, hideous gap in the concrete that flooded during heavy rain. Solving the flooding problem was a must, but digging up the concrete to install a new drain of some description wasn't an option I was prepared to even consider incorporating into the frugal budget, so here's what I did.

The day we moved into the cottage

This is what I refer to, very loosely, as our patio. It's a concreted area outside the back door that stretches for about 10 metres. It's ideal for parking planters, junk, log store, bins and coal bunkers, but it had the problem of a huge gap in the middle, which I quickly filled with gravel in an effort to make it less hideous.

It didn't take too long to clear out all the junk, most of which was recycleable in some way, shape or form, so we have had the use of this patio area for sitting out during dry weather. On numerous occasions, we've eaten breakfast, lunch and dinner out there, as it's often warmer outside than in, especially during the sunny winter and spring days. It's an absolute suntrap, so all the tubs and fishboxes got moved along the south facing wall and used for sowing seeds. But the problem remained - a muckle great hole that was both unsightly and a bit of a 'tripping-up' point when carrying stuff about the place.


This is the ghastly 'hole' filled with gravel raked from elsewhere to prevent anyone falling into it. At its widest and longest points, it's about a metre wide and about 3 metres long.

Last month, I began raking out the stones in the hope of finding concrete beneath it but, instead, found rocky soil! Instant appeal, as I'd just found myself another little patch of potentially productive growing space! Cue hand tools - a spade was useless as it was too rocky.

The soil I found underneath wasn't too bad, it certainly wasn't worth ignoring or covering in concrete - we can't eat concrete and no comments, please, about my rock buns! :)

Raking about in the ever-increasing heap of junk that was being piled high in the garden, I found a length of plastic, possibly off an old waterpipe. That fitted nicely around the far end of the 'hole' and gave me a template from which to work. I'd to wedge it with rocks to stop it springing back out but it eventually stayed in place and allowed me to follow the line with my incessant digging.

There were some pretty big rocks got dug out from here, I can tell you. Some were more like boulders, fit to be built into the dry stone wall that borders our garden.

It took a full day of raking and digging to empty concrete canyon, but I saved the best of the soil for later use.

Next stage was a simple progression, as I couldn't see any of the bird tables from the kitchen window. I movedone and placed in the middle ofthis new 'patio garden, separating my hole in the ground into two holes in the ground.

Among all the rubbish that was here, we had salvaged several lengths of drain pipe, so a piece of that was incorporated along the edge in the hope that surplus surface water would be channeled off further from the seating area. The other reason, of course, was to provide some sheltered hiding place for the lizards, toads and frogs that frequent the back garden - this might tempt them out of the woodpile, for a start!

We got plenty of rain for the next few days, so the pipe theory of sending the water away proved to be very effective. Keeping everything in place was a simple matter of strategically positioning the rocks that had been dug out of there.

Next was what to plant. I had been reading about herb spirals on some of the permaculture newsletters and these sounded very interesting, although completely impractical, being 2 metres across when I had only a 1 metre near-circle, but I couldn't see any reason why I couldn't adapt the design to use up more of the rocks. So, my first spiral, or circulal, garden was born.

I built it up in the middle by making a smaller circle with log slices, filled it with the recently removed soil then began transplanting some of last year's strawberry cuttings, along with some thyme and some lupins that needed splitting. I even treated the new garden to a sprinkling of compost! This is at the far end of the patio, so any surplus rain water shouldn't lie, it should, hopefully, keep these strawberries watered.

Now for what to do with the other side, which flooded. It seemed simple to me... dig out a mini-pond! It would need to be ultra-frugal, as I had no pond liner and only what was lying about the place as materials, so more digging got done. I then laid some old fleece (previously used as curtain linings) along the bottom, taking the rough edges off the remaining rocks and stones.

On top of the fleece, I laid several feed bags, from the poultry grain. Over the top of that, I laid a layer of bubblewrap (we NEVER through out bubblewrap) and then a large polythene bag that had been saved from the sheepwool insulation... this seemed to do the trick and looked water tight, so now it was time to try filling it up with water.

I laid the drainpipe right to the edge of the mini-pond, so the rain water that pooled in that area could easily overflow the pond and run down into the circle garden. It took a variety of materials to hold down the plastic and I had the straight edge stepped up a little using a length of discarded wood. The ledge would hopefully help any critturs to safety if they inadvertently landed in the water.

The little patio garden was coming along nicely, multi-tasking as a wildlife 'playpark', bird feeding station and some extra growing space.

I kept adding bits and pieces that I found around the garden, surrounding it all in rocks, which we have plenty of here. I even transplanted several weeds from the side of the stream and sat the pots into the water on rocks. A square of plastic mesh got placed along the shallow end, allowing anything that climbs in the ability to climb back out again. Finally, a length of log, a baton of wood and two old steel hoops, possibly from a long forgotten cloche, were secured in place to hold the makeshift pondliner.

The final result looks very effective, considering it had cost absolutely nothing to construct. However, the first time Floppity rabbit saw it, she spent most of her time munching on the strawberry plants, so a remedy had to be found for that!

A quick search for 'companion planting' brought me to the conclusion that I needed something leafy, hardy and bunny friendly, so I have sown perpetual spinach around the outer edge of my circle.

The area is currently out of bounds to rabbits until the spinach grows big enough to distract her from the strawberries! I hope it works!

Since building this, I have now spent a hefty £8.29 on a solar fountain and we have been lucky enough to have had plenty of sun to keep it flowing.

Within the space of a couple of weeks, the strawberries are flowering and the spinach has begun to sprout. There are now also radish seeds sown and I raked up some old pine needles and moss to mulch the plants to try to protect them from the frosts we are still getting.

NYK Media