Showing posts with label Billy Can. Show all posts

Friday, 21 February 2014

Day 21 of Extremely Frugal February - Rustic and Shabby Chic!

Day 21 of 28 - Adding Some Rustic Tuna Tin Charm

Jade or Money Plant cutting in homemade tin can planter
It's not quite Feng Shui but the Jade plant, also known as 'money plant', is said to represent good fortune or prosperity, according to some Chinese traditions. It certainly has the ability to grow and flourish by way of multiplying into numerous cuttings and these, in turn, are gifted to others in the hope that they may prosper in their pursuit for frugal living.

The 'waste not, want not' ethos governs most things in a frugal lifestyle, just as decluttering means getting rid of all the things you no longer need, not just 'stuff'. Whether you sell it, give it away, delete it or recycle it, it's your choice, so long as it isn't binned unless absolutely necessary. This goes for all things - even plants!

This is my Jade plant, otherwise known as my lucky 'money plant'. Daughter found it in the bin while cleaning out the house she was about to move into around 5 or 6 years ago. The plant had obviously been knocked over and chewed by previous owner's dog, as the plastic pot is covered in bite marks around the edge - the soil had completely dried out, but the plant was still alive. This is the kind of gift I love my children bring me!

Homemade planter
I found an old mixing bowl and sat the rescued plant in it, gave it a drink and sprinkled some aquarium gravel around the bottom of it. It has been with me ever since and even survived being knocked off a shelf last year. The little pieces that got broken off got rescued and stuck in a pot of compost, then promptly abandoned over-winter in the plastic greenhouse.

Today, I repotted the first one and brought it indoors - it has a fine set of healthy roots and now has a lovely new pot holder! This little planter took all of about 20 minutes to make.

Here's how...

Tuna cans
Tonight's dinner, as you may already have guessed, included tuna - it was tuna pasta to be exact, cheap and cheerful. Empty tin cans have so many uses, from cookie cutters to pastry cutters, storage tins, ash trays, (yes, there are still smokers out there and I have to insist they step outside if they want to smoke while visiting Frugaldom), individual pie dishes and, of course, mini plant pot holders.

Materials needed for making a mini-planter
These are the materials I used to make my mini-planter. You don't need a hot glue gun, but I find mine handy for so many things and I did make it part of a money-saving challenge a few years back to cover the cost of this crafting investment.

  • Empty tuna tin
  • Twigs
  • Scrap card or stiff paper long enough to wrap around the can
  • Piece of string, rope, ribbon, cord or twine
I use the scrap of tin foil to prevent hot glue dripping onto the table, so ignore that. My card is a scrap of wallpaper, which I used to wrap around the tin, then I glued the twigs onto this. 

Before starting, trim all the twigs to roughly the same lengths and then begin gluing them around the edge of the tin. Next, tie the whole lot together, as this holds everything firmly in place until the glue is set. You could remove the string afterwards, but I chose to leave it in place.

Rustic look with natural twigs


The next bit isn't essential, but I thought it gave a better finish than just the base of the tin can. The only problem now is that my freebie microfibre cloth has a hole the size of a tuna tin cut out the corner of it! I thought this would be more absorbent for any drips that might result from careless watering of the plant.

Felt or fabric base
As well as being absorbent, the fabric base will help make this non-slip and prevent the tin from marking any wooden surfaces. 

That's it - your twiggy tuna can planter is complete and ready for its little pot plant and the plant can be anything you choose, even herbs for using in your kitchen. This one was made very quickly using a handful of twigs from my fireside basket - we keep all the twigs that blow down in the garden - but I will do a few more for my other cuttings and for sowing some early seeds indoors. You can use any size of tin available, so you are limited only by your own imagination.
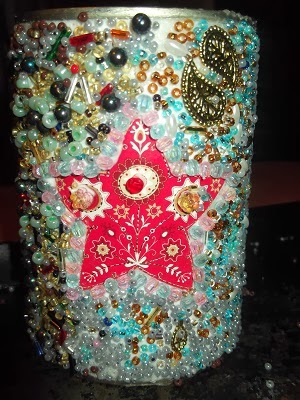
Billy can savings pot
Tin can-dle light
I have to admit to having a bin bag filled with empty tin cans because they are so handy for so many things. These are a couple of the other items I have made in the past but there are still plenty more tin can creations to come later this year. I'll blog them as I do them to save confusion. 

On the left is my 'blinged up' Billy can' and on the right, the first nail-punched Christmas lantern.

NYK, Frugaldom

Thursday, 13 February 2014

Day 13 of Extremely Frugal February - Chick Peas and Cheap Ice Ceam

Day 13 of 28 - A Touch of Summer!

How can I possibly think of summer when I get up in the morning to a house that's 6 degrees C, I ask myself? You'll soon see.

My roast beef-stretching project has gone on temporary hold by way of freezing what was left of the beef and cabbage to enable me to use up the rest of the potatoes, sprouts and turnip.

After the usual routine of porridge for breakfast, today's lunch was toasted cheese with pickle. (Cheese needs to be finely grated now to make it stretch further and bring it within the realms of frugaldom affordability.) As per last night's late post, I had soaked a pan of chick peas.

Today I boiled up the chick peas and then gave them a blast over the stove in a mixture of sesame oil, salt, pepper, mixed spice and chilli. This gave them an added snack-like appeal, so I set aside a cupful to mix in with tonight's dinner and the rest were left to cool, then bagged and popped into the freezer. These should be OK to use a handful at a time whenever I want or need them to bulk up a stew, casserole, stir dry or soup. I quite like eating them like peanuts!

What about dinner?

Leftover sprouts, potatoes and turnip all went into a big pan along with the small cup of the spicy chick peas. While the oven was heating, I diced and pan fried a breast of chicken with a clove of garlic, then threw in a handful of the frozen peppers. This all got added to the roasting tin, drizzled with oil and put into the oven until the potatoes were just beginning to roast. The plan had been to serve with a tomato-based sauce and rice, but I needed to use up the last of the boiled potatoes.

Now for the good part - a slither of summer amidst the winter storms. The mixed fruit I had defrosted overnight turned out to be a mix of stewed apples, rhubarb, raspberries and blackcurrants, so I set about turning it into something more than just ice cream for my Valentine's Day treat! Here's how it went.

A Little Taste of Summer


The ice cream mix is available right now on the Approved Food website at 6 packs for 99p. It uses only 150ml of milk and it works just fine with powdered, if that's all you have. Coincidentally, there's Marvel on offer and mango pulp, so I was sorely tempted to stock up for summer!


The ice cream mix whisks up like double cream and roughly doubles in volume. You simply tip it into a lidded contained and then stir in your favourite accompaniment.


My chosen accompaniment for this batch of frugal ice cream is a couple of tablespoons of my home-grown summer fruit sweetened with a spoonful of vanilla sugar. 


This is my ice cream mix all ready to go into the freezer. It's in a large plastic tub but you could use two smaller margarine tubs and make it as two different flavours.


Meanwhile, I still had all of this stewed fruit left, so you can guess what I did with it, cant you? When putting the ice cream mix into the freezer, I retrieved my bag of crumble mix...


... and made another big fruit crumble that serves 6, so it will last us 3 days. By the time I had made dinner and baked the crumble, the ice cream was frozen, so guess what we had for dessert tonight? :)
BILLY CAN to the rescue! I am so, so tempted to go and order a stock of that ice cream mix, as I'm down to my last 3 sachets... if I ordered the mango pulp I could easily save a small fortune and have the luxury of ice cream and sorbet here all summer! I'll pop a £20 note into the tin and sleep on it! (Sleep on the notion to spend, not the tin!) There really isn't anything I NEED at the moment, what with so much to be used to keep stock rotating, and I certainly don't want to end up with anything needing binned! Can I warrant a minimum £15 order? £20 note into the tin... Will I, won't I? Will I, won't I? Will I, won't I? Grocery budget already at £151.71 for the year to date, which is way over average because of the freezer order for new year. On the other hand, almost anyone could spent £15 over the period of the summer buying ice lollies and ice cream, whereas that amount could get me a whole load of ingredients and the opportunity to stock up on pasta at 99p for 3kg... I'll let you know tomorrow, whatever I decide.
NYK, Frugaldom.

Tuesday, 14 January 2014

Frugal Fun with our Interest Beater Challenge

This will Test your Will Power

In 2007, I began the Billy Can Plan to help generate extra savings and then, in 2008, along came the Interest Beater Challenge. To celebrate 5 years of interest beating and 15 years of assorted money challenges, we're having a creative makeover.

For those of you who haven't had the chance to read all about it in the Frugal Forums this is a bite-sized. photo roundup of the 2014 challenge to beat the interest rates (shouldn't be too difficult in the current economic climate) and earn ourselves a better rate of interest than any of the instant access, cash ISAs are offering WITHOUT needing money in the bank.

STEP 1 - Go get your old Billy Can
(It's time he brightened up a bit, don't you think?)
 
 
STEP 2 - Turn it into a Frugal Faberge-esque Billy Cans!
(Beads, buttons and recycled greetings cards)
 
 
STEP 3 - Prepare this year's notebook & diary (or add more pages to your old ones)
(This is the Frugaldom cash cow notebook, it can keep an eye on all the savings)


STEP 4 - Decorate your magic money box
(Recycled Christmas cards and shiny buttons can provide the basics)
 
 
STEP 5 - Pop a penny in your Mo(ney) Jo(urney) bag
(No excuses for losing your mojo now!)
 

That's it - 5 simple steps to preparing for this year's interest beater challenge and, as usual, it is totally free to join us in the forums and take part.
 
See you there!
 
NYK, Frugaldom