Day 4 of 31 - It's Pancake Day!
.jpg) |
| March 11th - 14th, conversations with 42 global leaders - free online event! |
Pancakes all Round!

This morning when I got up, the sun was shining through the living room window and onto the newly hung mini plant pot holders - there was a little bit of heat, briefly, until the sun shifted round another degree and out of reach of any of my windows - a definite minus point in the house 'directional facing' stakes!
.JPG)
We forewent the usual porridge at breakfast in favour of pancakes, but I cheated and used a cheap 'just add water or milk' packet mix and, of course, added water.
I like my pancakes made crepe-style, so the batter covers the entire frying pan. This makes them large enough and thin enough to roll them up and serve hot with fillings, depending on what's available.
They shouldn't be too dark, I prefer mine just lightly cooked then flipped. These are so cheap and easy to make that we do tend to have them quite often throughout the year, especially when the ducks are laying. Scoop of flour, pinch of salt, an egg and some milk to the consistency that you most prefer - that's it! They are versatile enough to serve sweet or savoury, with a variety of toppings.
.JPG)
For me, it's usually a sprinkle of sugar and lemon juice, as Maple syrup just isn't on the frugal grocery list. Ordinary syrup is nice, as is a handful of strawberries and a dollop of ice cream and/or cream, but that's more of a 'use up the garden strawberries and homemade ice cream' combination. Today, I had mango!
Pancakes were my first 'make' of 'Making it in March', but now for a Frugaldom special announcement ...
HAPPY BIRTHDAY SILKIE, 5 YEARS OLD TODAY!

On this day, five years ago, my first little Silkie chick hatched out in the polystyrene incubator despite the abuse the eggs had taken during their journey to me via Royal Mail. I'd bought half a dozen hatching eggs via eBay and the box arrived looking like someone had kicked it! Despite this, I set the eggs, turned them faithfully every few hours for 18 days and then waited patiently for day 21 to arrive in the hope that something would hatch - without holding out too much hope, I might add!

On 4th March, 2009, out popped one solitary Silkie chick, one that we aptly named 'Silkie Chick'. She is still known by that name to this day, a full five years later! This is her hatching from her shell inside the tiny incubator that was set up on my desk at the time.

Sadly, none of the other eggs hatched, so this chick ended up being reared in a cardboard box in the porch and preferred to behave more like a dog than a chicken! She was cheeky right from the start! She did eventually settle with the other hens and we did get her Silkie company by way of little Dumbledorf.

We eventually hatched another 5 blue cuckoo striped Silkies for additional company and, over the years, Silkie Chick has hatched and reared a few chicks herself, but she is now the only furry-looking bantam we have left after a mink went on the rampage in broad daylight in October 2011. Little Silkie Chick, here, survived the attack only because she was hiding inside the rabbit hutch where she had decided to lay her eggs! Daft old bird!
But I digress, again! On to more 'Making it in March'. I made it into the kitchen to unpack my latest '
MuscleFood'* order: 5 kilos of chicken breast fillets, 2 kilos of turkey mince and a kilo of boned chicken thighs. Yes, we BUY our chicken - you didn't really think we ate any of our own home-hatched or home-reared birds, did you? Anyhow, this lot arrived and I managed to fit it all into the freezer after splitting it up - the turkey mince was on offer at £1 per 400g pack with maximum 5 per customer, so I got my 5. The chicken thighs were paid using loyalty points, thanks to online friends who have used my referral links and codes. This order should keep us going for the next couple of months, as I still have plenty of beef mince, bacon and pie filling in the freezer. But not only that, the order included
an added free gift... A CAT DEN! Scruffy Cat will love it, I'm sure! :)
.jpg)
Remember all the 'rubbish' leftover after unpacking the new living room door? Pieces of polystyrene, 4 plastic corner protectors, 4 strips of thin wooden board, assorted spacers, board edge protectors etc.?
I finally found a way to recycle some of this 'rubbish', along with the cardboard box and insulated liner that came with the meat order this afternoon. Naturally, I saved the ice packs into the freezer.
.JPG) |
| Turning a cardboard box into a cat den |
I started by removing the flaps from the box so I could use these to create a roof with 'attic' space for storing all the cat's toys.
.JPG) |
| Making a door in the insulated box liner |
Next thing I did was to cut an entrance (and exit) door in the insulated box liner, roughly the size of a small cat flap.
.JPG) |
| Making the apex roof with attic space |
Is anyone else trying this? Take the four cardboard flaps cut from the box and pair them up - one long and one short - lengthwise. Overlap the longest piece over the shortest piece where you will be folding it in half to create the apex roof. I initially used tape before gluing it in place. You should now have two equal lengths of cardboard. Fold these in half to form a right angle. This is where I was lucky to have saved the door packaging, because I was able to use the corner protectors to hold the cardboard at the 90 degree angle by gluing in the plastic, but you could simply fold and glue scrap cardboard. Do the same with the second strip and then these need to be joined together, side by side.
.JPG) |
| Reinforcing the apex roof |
I used three of the four plastic corner protectors for the roof - one at each end and one in the middle and, rather than glue it all together with more cardboard, I used two of the pieces of board from my 'rubbish' stash. If you glue your board or card about 6cm from the edge of the cardboard, it makes a small ledge that helps to prevent the roof slipping while gluing it to the box.
.JPG) |
| Adding the roof to the box |
Before adding the roof, I covered the main box in fabric - I used some more of the old fleece that I had covered my homemade footstools in a couple of weeks ago. Next, I replaced the insulation liner and glued it into place. I reinforced the front of the box using a third piece of board.
Next, I used the little folded pieces of stiff card and glued then along each of the side edges of the box and then glued the roof onto these. I was left with one plastic corner piece from my 'rubbish' stash, so this gave me another idea! I had also kept the pieces from a broken A4 picture frame - the type you see in pound shops. (The glass didn't break, so that got kept, too.) I used the two longer pieces of the frame as edging for the cardboard roof and joined them together using the fourth corner piece as a feature at the peak of the apex.
.JPG) |
| Side view of the cat house in construction |
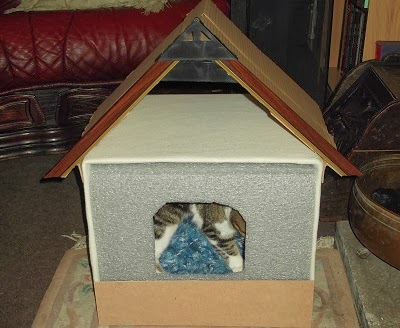
Before doing any more work on the cat's house, I decided to introduce the frugal puss to her new 'den', just to make sure she actually fitted through the door! As you can see, I haven't added any roof décor or edges to the attic space.
.JPG) |
| Scruffy cat investigating her new 'den' |
Another rummage in my crafty stash and this time I was able to retrieve someone's unfinished project that was sent to me for recycling into
McGonk stuffing. Using my largest crochet hook, I crocheted the last of the ball of wool onto what was already there; it made a near perfect sized cat blanket for lining the bottom of the box.
.JPG) |
| Woolly blanket for the cat's new bed |
Blanket completed, I fitted it into the box and then waited for the cat to pass judgement. Her first reaction was to go inside and play 'paddy-paw' on her new fluffy blanket, so I think she approves.
.JPG) |
| Let sleeping cats lie. |
That's as far as I got with Project Cat's Den today, so I'll need to continue with this project tomorrow, when I'll add the attic pieces and get the roof tiled - I'm sure I have enough scrap cardboard in stock to cut and overlay cardboard shingles, rather than just paint the roof. :) I want to start doing that right now but, once again, the day has passed far too quickly. Now it's almost time to find the cat's pyjamas!
NYK, Frugaldom
* Friend referral link, which has the potential to earn me a few extra loyalty points.
.JPG)
.JPG)

You are so creative! I'm now beginning to look at our "rubbish" differently. Thanks for your fantastic blog.
ReplyDeleteEileen
Perhaps it's just an over-active imagination I have? LOL
Deleteyou may have an over active imagination, but at least you put it to good use!!!
ReplyDeleteHee hee hee... only as far as you can see by my blogging. I have so many wacky ideas that I daren't write about the for fear of being labelled a crazy woman. In saying that... it certainly wouldn't be the first time I'd been called that or any combination of wacky, psycho, loony.... you get the picture. :)
DeleteYou have an amazing brain NYK! Really fantastic way of recycling!
ReplyDeleteTake it easy dear lady. Xx
This is how I take it easy, RW, it's like my hobbies, entertainment and holidays all rolled into one. :) It takes my mind off the past 5 years of 0.5% interest rates while trying to save for the future! What a disaster that has been, as far as savings are concerned. All that plus ever rising prices and now the threat of a sugar tax? I think you might be seeing more and more blogging about corner cutting, cost cutting, cardboard cutting, creative accounting and crazy creations. :)
Delete